
Want to give your plain beanie a personal touch? Adding a patch is an easy way to show off your style, represent your team, or display your favorite design. But because beanies are made from stretchy fabric, attaching a patch takes a little extra care.
To sew a patch on a beanie, position the patch, secure it with pins or fabric clips, and use a needle and matching thread to make small whip stitches around its edges. Finish with a secure knot inside the beanie, keeping the knit fabric relaxed throughout the process.
This guide explains how to sew a patch on a beanie by hand, choose the right materials, and avoid common stitching mistakes.
What You'll Need to Sew a Patch on a Beanie
Before you start, gather these basic sewing supplies:
Beanie: A knit, wool, acrylic, or fleece beanie.
Patch: An embroidered or woven patch with a stitchable border.
Needle: A hand-sewing needle suitable for your patch and fabric. A rounded-tip needle can help protect knit loops.
Thread: Strong polyester thread that matches the patch border.
Scissors: Small, sharp scissors for trimming thread.
Fabric clips or pins: To keep the patch in place.
Thimble (optional): Helpful when sewing through thicker patch borders.
Choose a patch that can move comfortably with your beanie. A thick, rigid patch may restrict the stretch of knitted fabric, especially around the folded cuff.
For most knitted beanies, sewing is preferable to heat bonding because it avoids exposing the fabric to high temperatures. If you're unsure which attachment method to choose, our guide to different patch backing types explains the available options.
How to Sew a Patch on a Beanie: Step-by-Step
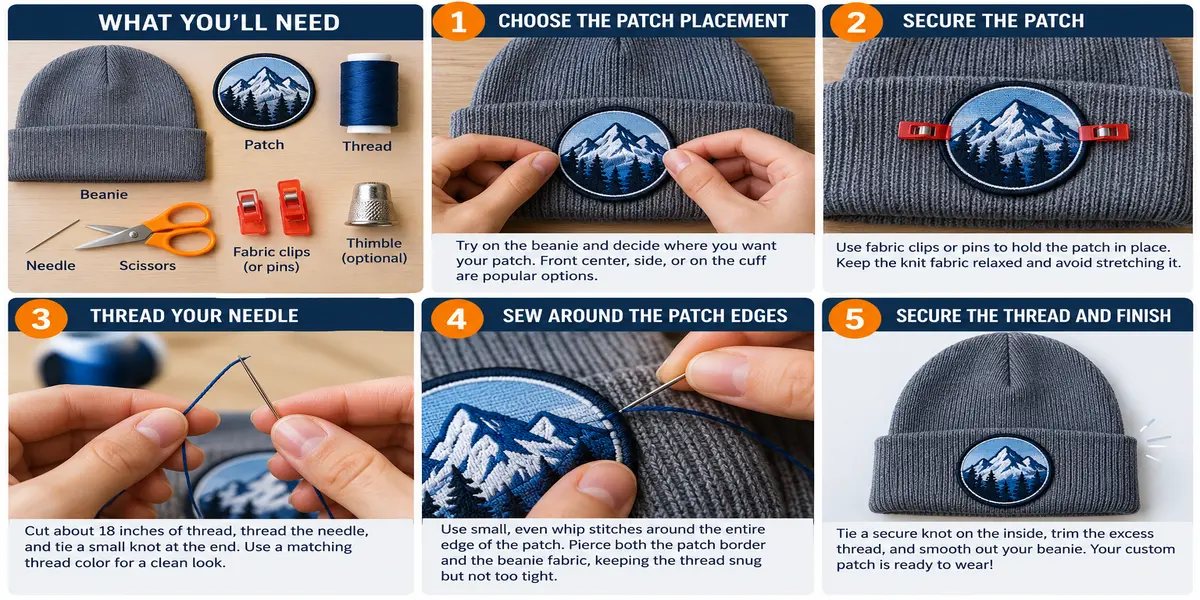
You don't need professional sewing experience to attach a patch to your favorite winter hat. Follow these five steps for a neat, secure finish.
Step 1: Choose Where to Place the Patch
Start by deciding where you want your patch to sit.
The front center is a popular choice for logos and simple designs, while side placement creates a more subtle look. You can also attach a patch to the folded cuff for a classic beanie style.
Put the beanie on and check the placement in a mirror. Remember that knitted fabric changes shape when worn, so a patch that looks straight on a table may appear crooked on your head.
Once you're happy with the position, remove the beanie and mark the placement lightly if necessary.
Quick tip: Keep the patch away from areas that need significant stretching. A small patch on the front cuff is often easier to position than a large design across the crown.
Step 2: Secure the Patch in Place
Lay the beanie on a clean, flat surface without pulling or stretching the fabric.
Position the patch where you marked it and secure it with fabric clips or a few carefully placed pins.
This prevents the patch from shifting while you sew and helps maintain even stitching around the edges.
If you're attaching a patch to a folded cuff, check whether the cuff can still unfold. Decide whether you want to sew through the folded layers or only the outer layer before starting.
Important: Avoid stretching the knit tightly beneath the patch. When the fabric relaxes, excessive tension can cause wrinkles or puckering around the design.
Step 3: Thread Your Needle
Cut approximately 18 inches of polyester thread. Choose a color that matches your patch border so the stitches blend into the design.
Pass the thread through the needle's eye and tie a small, secure knot at the end. You can double the thread for additional strength if your needle and patch thickness allow it.
Turn the beanie slightly inside out and identify where your first stitch will go.
Starting from the inside helps conceal the knot and gives the finished patch a cleaner appearance.
Quick tip: Avoid using an excessively long piece of thread. It can become tangled while you're working through knitted fabric.
Step 4: Sew Around the Patch Edges
Begin by bringing the needle from the inside of the beanie toward the edge of the patch.
Push the needle through the beanie fabric and catch the patch border. Then bring the thread over the edge and pass the needle back through the knit.
Repeat this process around the patch using small, evenly spaced whip stitches.
For many embroidered patches, stitches spaced approximately 1/8 inch apart provide a useful starting point. Adjust the spacing according to the patch's shape, border, and fabric thickness.
Keep the thread snug enough to hold the patch securely, but not so tight that it pulls the knit fabric together.
If you're sewing around corners or curves, use shorter stitches to keep the edges flat.
Check your progress occasionally to make sure the patch hasn't shifted.
Helpful tip: Place one hand inside the beanie while stitching to avoid accidentally sewing through the opposite side.
If you're also customizing baseball caps, snapbacks, or bucket hats, read our guide on how to sew a patch on a hat by hand for additional techniques.
Step 5: Secure the Thread and Finish
Once you've stitched around the entire patch, bring the needle back to the inside of the beanie.
Pass the thread beneath a nearby stitch, make a secure finishing knot, and trim the excess thread with scissors.
Turn the beanie right side out and gently smooth the fabric around the patch.
Run your fingers along the edges to check for loose areas. If any corner lifts, add a few small stitches before finishing.
Finally, try on your beanie to make sure the patch sits comfortably and doesn't restrict the fit.
Your customized beanie is now ready to wear!
Tips for Sewing a Patch on a Knit Beanie
Knitted beanies need a little more attention than regular cotton hats because their fabric stretches and moves.
Here are a few ways to get better results:
Keep the fabric relaxed: Don't stretch the beanie tightly while sewing.
Choose a flexible patch: Smaller embroidered or woven designs generally work better on stretchy surfaces than large, rigid patches.
Use even stitches: Consistent stitch spacing helps the patch stay flat.
Control thread tension: Pulling too tightly can create puckering around the border.
Protect the knit loops: Avoid forcing a sharp needle through yarn strands when you can pass between them.
Check the fit: Try on the beanie before and after sewing to make sure it remains comfortable.
For ribbed beanies, pay particular attention to the raised knit pattern. The patch should sit smoothly without pulling the ribs together.
Can You Iron a Patch Onto a Beanie Instead?
Yes, some beanies can accept iron-on patches, but sewing is generally a safer choice for stretchy or heat-sensitive knit fabrics.
Many beanies contain acrylic, polyester, wool, or blended fibers that may shrink, distort, scorch, or become damaged when exposed to excessive heat.
Iron-on adhesive can also struggle to maintain a reliable bond on fabric that stretches repeatedly.
If you want to use an iron-on patch, check the beanie's care label and the patch manufacturer's application instructions before applying heat.
Never assume that a temperature suitable for cotton will be safe for an acrylic or wool-blend beanie.
In many cases, you can sew an iron-on patch around its border without activating the adhesive.
For more information about suitable fabrics and application methods, see our guide on how to iron on a patch.
Common Mistakes to Avoid When Sewing a Patch on a Beanie
Even a simple sewing project can go wrong if the fabric or patch isn't handled carefully.
1. Stretching the beanie while sewing
Stretching the knit can cause the fabric to bunch up once you release it. Keep the material in its natural, relaxed position.
2. Pulling the stitches too tightly
Tight stitches can distort the patch and create visible wrinkles. Use gentle, consistent tension.
3. Choosing a patch that's too large
Oversized patches can make a soft beanie feel stiff and uncomfortable. Choose a size that suits the available space and fabric stretch.
4. Skipping the placement check
A patch may look centered when the beanie is flat but appear uneven when worn. Always check the position on your head first.
5. Leaving the finishing knot loose
An unsecured knot can allow stitches to loosen over time. Tie off the thread firmly and check the patch edges before wearing the beanie.
If you notice puckering while sewing, stop and loosen the affected stitches before continuing. Trying to flatten the fabric by pulling harder usually makes the problem worse.
Customize Your Beanie With Custom Patch House
A carefully sewn patch can turn an ordinary beanie into something personal, whether you're creating branded winter hats, team merchandise, or a one-of-a-kind accessory.
At Custom Patch House, we offer custom embroidered patches for logos, artwork, and personalized designs. If you prefer an attachment method that works without heat, explore our custom sew-on patches.
Choose a design that suits your beanie, follow the sewing steps above, and give your winter hat a custom look that's made to last.
Frequently asked questions
- Can you sew a patch onto a knitted beanie?
- Yes. You can sew embroidered, woven, and other stitchable patches onto knitted beanies. Keep the fabric relaxed, use a suitable needle, and avoid pulling the thread too tightly. This helps prevent puckering and keeps the beanie comfortable.
- What stitch is best for sewing a patch onto a beanie?
- A whip stitch is a practical choice for most bordered patches because it secures the edges with small, repeated stitches. A running stitch can also work when the patch construction allows you to sew just inside its border.
- Can you sew an iron-on patch onto a beanie?
- Yes. Many iron-on patches can also be sewn onto beanies. Stitch around the patch's border rather than relying on heat-activated adhesive, especially if the beanie contains acrylic or other heat-sensitive fibers.
- Will sewing a patch damage a beanie?
- Sewing a patch shouldn't significantly damage a beanie when done carefully, but needles can snag yarn or leave visible holes. Use an appropriate needle, avoid splitting knit loops, and maintain gentle thread tension to reduce the risk.